Based on Studio2022 v4.2.1.
Stitching Optimization#
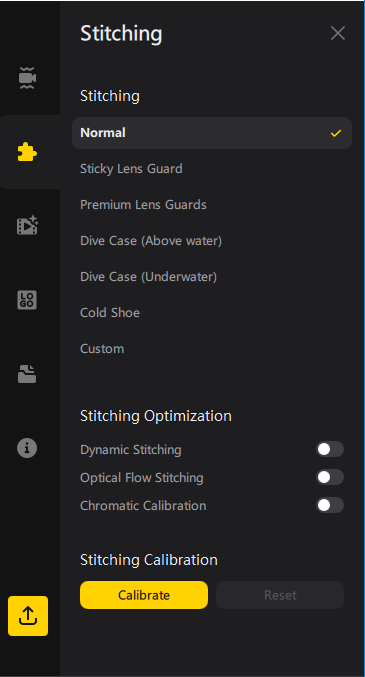 If no dedicated stitching option is selected Studio202x uses its "Standard Stitching." Stitching options on this panel are meant to be used to optimize the stitching. This is a choice between quality - which can also be content driven - and processing time.
Standard Stitching#
This method works well when most of the images are distant scenes, and it provides the fastest stitching speed.
Dynamic Stitching#
By this method the stitching is optimized for close-up shots and scenes with motion and rapid changes. This is done by a deeper look at each single frame and visual pattern. Also the stitching of each frame is aligned. By this all Dynamic Stitching is slower than Standard Stitching.
Optical Flow Stitching#
This is like the dot on the i with Dynamic Stitching. Like there also with Optical Flow Stitching the stitching of each frame is aligned and data is shared across frames. You want to use that also for dynamical scenes and close-ups. The stitching effect will be better than Dynamic Stitching due to a higher stitching accuracy and fewer artefacts in some scenes. But the processing speed will be slower than Dynamic Stitching.
Chromatic Calibration#
It enhances the exposure equality and quality of both lens sides. By that - don't know if it is a side effect or primary intention - it reduces chromatic aberration at the stitch line which also helps to do a better stitching. In short it also softens the light borders at the stitch line.
To equalize exposures can have drawbacks. It can happen that on one side bright objects get even brighter "reflection" spots. But that's very very rare.
You can see the effect at best if you record a short video with the "isolated" mode at your cars dashboard. That will give you a semi hard border between lenses per default because mainly that mode is meant to be used in car-multiview-mode. What it should do is give each lens separate exposures to show all in the car but also have the outside shown without blow-outs. Now notice that border line and switch off "chromatic calibration" which mostly is set automatically. You will notice the border at the stitch line gets even harder.
Disabling it can result in a slightly more direct noticeable stitchline at some occasions but overall it has more benefits. Mostly I enable / leave it on.
Stitching calibration#
Stitching calibration, the button and not the slider since v3.6.4, generate a sort of stitching reference guide pattern which Studio202x then uses as a base for its further stitching algorithms.
You use it by selecting a frame in your video where stitching went off or does not look good and hit the "calibration" button. At most times you will see a gain in that frame. The gathered data by that is then used for that content as a base for the stitching.
That function is different from the function you might know of the OneX app which does save a base pattern / data set in the camera.
In addition, which mostly replaces the case type stitching settings, there is a "custom stitching" for OneR/X2. By that you give - as far as I know - a kind of offset to the stitching how narrow or wide the analysed area should be. In some cases where the case based stitching type leaves a bit to see from case or protectors, it can help to get rid of that.